Resizing Images
Resizing with Photofiltre
EasyPhpAlbum is capable of resizing your images on-the-fly. It will resize the images to a fixed size in pixels (for example 640px) or a dynamic size depending on the visitors monitor screensize (this setting is determined in the EasyPhpAlbum configuration). This enables you to upload your digital images directly from your camera to your website without any modifications!
However… some webservers have very restrictive settings on memory usage of PHP. If your images are too big (filesize or pixel size), PHP will not be able to resize them and you will see the small box with a cross in it indicating the image cannot be displayed. If this happens you have two options:
- Increase the PHP memory limit in the etc/php.ini file until it works
- Upload your images in a smaller size
If you have many images to upload and they all have to be resized for the web, this could be quite time consuming unless you use a programme that has the option for ‘batch-resizing’. You can download the free image editing tool PhotoFiltre Free) and take the following actions:
- Copy all your digital images from your camera to your PC
- Create a new empty directory, for example ‘internetformat’
- Install the software PhotoFiltre and start it
- Open the menu ‘Tools’ and select ‘Automate / Batch’ (step1)
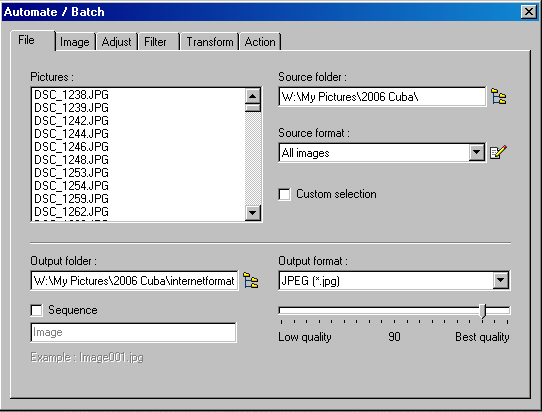
- Select the source folder – this is the directory with the digital images from your camera (step2)
- Select the output folder – this is the directory for the new resized images (step2)
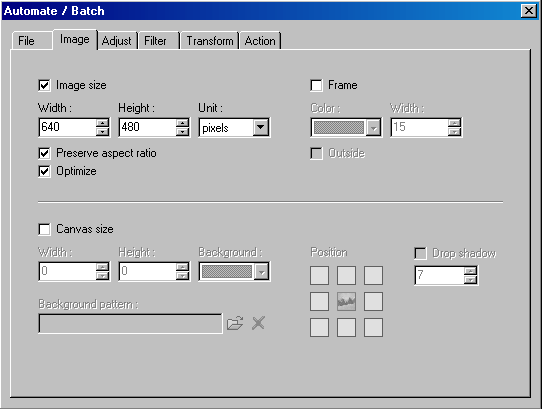
- Click the tab screen ‘Image’, enable ‘image size’ option and specify a width (step3)
- Click the tab screen ‘Action’ and click OK (step4) – wait until the resize is complete and close this window
Now all your images have been copied to the directory ‘internetformat’ and they have been resized to a smaller size so they can be used on the internet! Upload all the images to a directory on your webserver, include the EasyPhpAlbum index.php script and your photo album is on-line.
Step 1:

Step2 :
Step 3:
Step 4:
